My dad is an avid reader. He goes through times that he reads almost a book a day. That said, you can't just buy him a book for his birthday or a holiday. The other day I was in the Goodwill store and they where having a great sale on their books. 5 for $1.00. I picked up a book for my dad...sure enough, he had read it.
So, what to do with a book he had already read that was a great deal?
Have any of you ever watched the movie "The Shawshank Redemption"? Remember what was hidden in the bible? Yeah, I got that idea.
I decided to keep some pages free at the beginning of the book and use the rest to make a secret compartment. First I put a piece of wax paper after my last page of "free" section and after real last page (in front of the back cover). I then used my mod podge to glue the pages between the wax paper together. After you apply one coat, let it dry with other books or something heavy sitting on top of it. This will insure the pages are pushed together while they dry. Add a second or third coat. Then you can begin to carve out the inside. Let me just say that this is not any fun. I have kept all the page pieces to use on other project as well.
Once I finish carving out the inside, I will mod podge the inside. I will use sand paper to make sure the sides are smooth. I might even paint the inside with acrylic paint just for a "pop."
I will show you some of the other crafts that have come out of this project!
I have two days a week that both kids are in a program at church. Yay for me time!!
Thanks for coming by,
Friday, September 10, 2010
Thursday, July 22, 2010
Butterfly Hole Punch 2
My daughter and I go to the dollar store at least once a week. On our weekly trip I ran across some long frames that I thought would be perfect for a project I had in mind. A while ago I saw this (butterflies in a frame) project featured on the blog One Pretty Thing. (Which I check on almost a daily basis.)
One more thing: Whenever I go to Home Depot, I always have to go by the paint section. I am not really sure why, but it is my favorite. On one of my trips I brought home a booklet with paint ideas for different rooms. I loved the ideas...then I got one more.
I began to punch out butterfies using the paint idea book. There where some beautiful textures and color combinations. The resulting butterflies are stunning. I LOVE them.
The mat in the frame needed to have the dividers removed. I then cut wrapping paper to fit the frame.
Finally, I used small glue dots to place the butterflies. Of course, I am a bit of a freak about them being equidistant. I printed off a table from my word processing software and used it as a guide to punch the holes I needed.
I will take a picture when I put it up and add it here. I also need to finish the second frame. So, keep an eye out for new pictures.
Thanks!!
One more thing: Whenever I go to Home Depot, I always have to go by the paint section. I am not really sure why, but it is my favorite. On one of my trips I brought home a booklet with paint ideas for different rooms. I loved the ideas...then I got one more.
I began to punch out butterfies using the paint idea book. There where some beautiful textures and color combinations. The resulting butterflies are stunning. I LOVE them.
The mat in the frame needed to have the dividers removed. I then cut wrapping paper to fit the frame.
Thanks!!
Tuesday, July 20, 2010
Butterfly Hole Punch!
I found a Martha Stewart butterfly punch while I was at either Ross or Marshall's. The price was about $4.00. I picked it up not really knowing what would come of it, but seeing lots of fun in my future.
I had attempted to make a light canvas, but it did not come out like I wanted...so there will be no pictures here. Of course, I had make holes in the canvas to push the lights through. This left a "ruined" canvas. I did not have the heart to throw it away and thought maybe I could just cover the whole canvas in paper once inspiration hit.
Well, call the butterfly hole punch inspiration!! I found it really hard to take a picture of it on the wall. The only time that room gets full light it early morning, and I always forget to take a picture then.
I have some really pretty scrapbook paper. Some of the flowers have glitter on them. I punched out butterflies from a solid color sheet as well. I then just used some hot glue to put butterflies over the holes left from the lights.
Here are some close-ups.
Thanks for coming by,
Sunday, June 27, 2010
Been away
I can't believe I haven't posted anything in so long. This time of year tends to be really busy for us. Our son's birthday is in May. Our daughter's is in June. Then of course, we have a niece who was born the day after our daughter. My son has a best friend who also had a birthday in June. SOOO I am oficially "birthdayd" out.
Don't get me wrong, I love throwing my children's parties. I love to decorate, make goody bags and the food! I am the kind of person who buys things all year long to go into the goody bags. I begin planning the next year's party as soon as the party is over. I love having the parties at our house. I love having family from out of town make it in for one of our parties. I am just relieved that we are done for this year.
Now it is time for me. I would like to open an etsy store this fall. Come September, I will have 2 days a week when both kids are at preschool for 5 hours. This will be the perfect time for me to really focus on what I want to do. I told my husband that before I open my store, I really want to have more "stock."
Now you know why I have been away. I hope to have a new post once a week from here on out.
thanks for coming by
Sunday, May 16, 2010
New Stuff I Have Done
When I came across this tutorial for Clothespin Dolls, I was in love. (Thank you Going Sew Crazy for the tutorial!) I think these will be really cute as a take home for my daughter's birthday party coming up in mid June. I plan to put a little candy in their "hands" or maybe a "thank you for coming" note.
I picked up a jewelry box from goodwill for $3.00 the other day. There was not really anything wrong with it, but I wanted to give it an "adult" update. I need to add the ribbon around the front and bottom to be done. I am really happy about how it has turned out.
BEFORE:
AFTER:
Like always, I have more stuff I am working on.
Thanks for coming by!
Friday, May 14, 2010
Busy...busy...busy
I can't believe how long it has been since I have posted anything. We have been busy little bees. My son just turned 4 and my daughter is about to turn 2. I love big birthday parties, which require some work. I have a couple of things I want to show you, but have not uploaded the pictures yet. The weather man says it will rain tomorrow so I should have time to get some stuff done.
I also got a really nice camera for Mother's Day. The Olympus e600. I LOVE Olympus. I can't even tell you when I got my first Olympus. My 4 year old takes pictures with my old stylus which is a 4 megapixel.
I *heart* this camera!
Please keep an eye out for some updated crafts done!!
Thanks!!
I also got a really nice camera for Mother's Day. The Olympus e600. I LOVE Olympus. I can't even tell you when I got my first Olympus. My 4 year old takes pictures with my old stylus which is a 4 megapixel.
I *heart* this camera!
Please keep an eye out for some updated crafts done!!
Thanks!!
Friday, March 26, 2010
Spring Petal Bag
I picked up this bag at the dollar store a while back with all the intentions of making another petal bag. I found a really cute dress for my little one yesterday and finally got motivated to make the bag.
The process is simple and inexpensive. The bag was $1.00, the petals where also $1.00. The bead trim I had on hand, but could have easily used ribbon.
I glued the petals right onto the bag using hot glue. I staggered the rows.When I got as far up the bag as I wanted to go, I trimmed the petals even. I then glued some pearl bead trim I had sitting around.
It took me no more than 45 minutes.
We're using for Easter eggs tomorrow!!
Thanks for coming by,
Tuesday, March 23, 2010
Use for Extra Stuff
I got new jeans a while back and happened to keep the hem. (It was about 2 inches.) I had thought that maybe I would make a headband. Looking around the blog world, I began to notice the "fabric flower" trend.
I trimmed the cut end so that it was even. I then hand sewed a running stitch with a knot at the end. I pulled it tight and got a flower!! I then added some buttons in the center. All I have to decide now is if I want to put them on hair clips or headbands.
Another little tid bit. I find myself facinated by empty dvd towers. The last one I had I covered the inside with tissue paper and added a battery operated tea light. With the short tower I finished the other day I had an "aha" moment. There are two cords I use all the time. My ipod cord and the camera cord. They usually are found under the mess on my desk or next to the tower. I coiled them and put them in the tower: PROBLEM SOLVED. It made me smile!!
(I am thinking of cutting holes into the sides so that I don't ever have to open it to use the cords, but can just pull the end out.)
Two post in one day!!
Smile often,
Flower Lantern
I saw a paper lantern "makeover" on craftynest. They show the large lanterns redone. I marked it as something I wanted to remember for future use.
Today at the dollar store, I found a paper lanterns with battery tea light and decided to try it out.
HOW TO:
materials-
1 paper lantern
3 flower stems
hot glue
string and tac (to hang)
Assemble the paper lantern. (I hung mine from my kitchen cabinet so that I could work on it.)
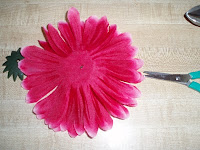
Take the backs of the flowers. Glue the center and petals together. Trim the back off the center so that it is flat.
Glue the flower to the lantern. Make sure the flower petals overlap. Glue some of the petals to the lantern where the flower petals fall away too far.
WHAT I LEARNED:
* Next time I will use smaller flowers. That way can cover the lantern completely. (Like craftynest.)
* I will use lighter colored flowers as well. My lantern had print on it so I needed to cover it, but I think yellow flowers would look really cute as well.
* The lantern I purchased had a tea light that changes color, so having some of the original lantern show was a good idea.
*The whole project took a little over an hour, but next time it should go faster.
* In order for these to be table top, the flowers should not be so close to the bottom.
The tea light changes colors so I tried to take some pics where you could see that. Sorry for the blur, I could not get my camera to cooperate. (purple, red and green)
Thanks for stopping by!!
Today at the dollar store, I found a paper lanterns with battery tea light and decided to try it out.
HOW TO:
materials-
1 paper lantern
3 flower stems
hot glue
string and tac (to hang)
Assemble the paper lantern. (I hung mine from my kitchen cabinet so that I could work on it.)
Take the backs of the flowers. Glue the center and petals together. Trim the back off the center so that it is flat.
Glue the flower to the lantern. Make sure the flower petals overlap. Glue some of the petals to the lantern where the flower petals fall away too far.
To further fill the space, trim extra flower petals and glue them in where needed. Use them to fill where the lantern images are easily seen.
WHAT I LEARNED:
* Next time I will use smaller flowers. That way can cover the lantern completely. (Like craftynest.)
* I will use lighter colored flowers as well. My lantern had print on it so I needed to cover it, but I think yellow flowers would look really cute as well.
* The lantern I purchased had a tea light that changes color, so having some of the original lantern show was a good idea.
*The whole project took a little over an hour, but next time it should go faster.
* In order for these to be table top, the flowers should not be so close to the bottom.
The tea light changes colors so I tried to take some pics where you could see that. Sorry for the blur, I could not get my camera to cooperate. (purple, red and green)
Thanks for stopping by!!
Sunday, March 14, 2010
Quick Pillow/ Stuffy Tutorial
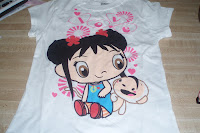
I was in Walmart the other day. I was looking at some t-shirts when my little one got hold of one that had Kai-lan on it. Of course, the t-shirt was a size 6 and my daughter is 19 months. She just hugged on it and would not let it go.
That of course gave me an idea when I got home. I made her a Kai-lan pillow out of the t-shirt. I was surprised by how cute it came out and how quickly I got done. Here's how.
Need:
t-shirt
sewing machine
stuffing
Here is the t-shirt I started with:
Turn the t-shirt inside out and pin it together.
I traced a line around the image about half an inch away. This was my sewing line. I pinned along the line so that the shirt did not move. Then just sew, but make sure to leave an opening so that you can turn the shirt inside out. (the picture below is of the shirt sewn.)
Next cut away the excess shirt. I left a little less than half an inch. Also be sure you clip into the excess, being careful not to cut a stich, so that the curves are smooth when you turn it inside out. I forgot to take pictures of this step or when I turned it inside out.
Once it is inside out, stuff and then stitch your opening closed. My little one loved it so much, she took her nap with it.
The whole process took me less than half an hour. If you have any questions, feel free to ask. I am very new to sewing so if I can do it, anyone can!!
Thanks for stopping by!!
Friday, February 19, 2010
Wall Art
I found this great site called Wordle. I have seen images like these before, but had no idea how they where made. Yesterday I played on this site for over an hour. Then inspiration hit - I should make one of these for my kids.
They came out WONDERFUL so I have to share.
(I am going to paint the frame pink.)
Materials:
paper (resume paper I had laying around)
8x10 picture frame (dollar store)
computer & printer
On wordle I entered each child's name in all capital letters, about 7 times. A word detected more often will be enlarged. I then entered lots of descriptive words for my kids in lower case. For example, my little girl was "sweet, diva, smile, princess." You get the idea.
Once you enter the words, the next stage has to do with the way the final product will look. You can change the font, the orientation of the words, and the color scheme. I found I could not select what color specific words where. (If you find this out, let me know.) Also, there are set color schemes you can use or you can customize your own. I wanted all pink tones for my daughter so I had to find a website that would give me the code for the colors I wanted. In comes this Hex Color Code Generator. I selected the pink tones on the spectrum, found the color scheme suggested, and entered them into wordle.
Once you have the image how you like it, you only have two options: print or save to gallery. I printed mine on some nice resume paper I had left over from my other life.
I purchased an 8x10 picture frame from the dollar store. I took the stand off the back so that I could place it on the wall without the bulk.
Now all you have to do is trim the printed image, reassemble the frame and hang it up. YOU ARE DONE!
I hung mine on their doors using Command Picture Hanging Strips.
As I was falling asleep last night I realized this would make a great wedding gift for a friend. I am going to put in their names with words to describe them and marriage. I also have one made for our family. I have a feeling this site will be on my "go to" list for quick, inexpensive gifts!
I hope you have an much fun as I did.
Thanks for coming by!!
Subscribe to:
Posts (Atom)