Showing posts with label kids. Show all posts

Saturday, July 18, 2015

Doll Finds...at Target

I have been avoiding Target lately. I find when I go in, I come out at least $100 less in the bank account and not a lot to show for it.

Yesterday I had to go to Target for a birthday present. Of course, I stopped at the bins by the front door. WOW. Right now they are stocked with lots of items for school teachers and lots of fun minion stuff.

Here are a couple of things I found that are perfect for my daughter's dolls:
little notebook
These are tiny.
A little dog with carrier on clearance.
Look at that cute face!!
Here she is with her new pet.
Ready for school!!

  
Little Backpack...PERFECT size.
$3 for this little cutie.


I LOVE finding fun, inexpensive doll things!!!!

Thursday, October 30, 2014

3rd Birthday Party Time

I have stated before how much I love birthday parties. Well, in a couple of weeks my little guy turns 3. I went back and forth between a Mickey party or a dinosaur party. I asked him again last week and he said dinosaur. So the theme is set!! (Yes, I did have to send out invites on short notice. His birthday snuck up on me.)

Of course my first stop is ALWAYS Pintrest. I loved the parties where they used their plants from all over the house to decorate one room. Too bad for me I have a black thumb. Plants just DIE around me. What this leaves me with is making my own plants.

I picked up packaging paper at the dollar store and made vines to hang. (You just scrunch and twist.) Thanks for my stash of scrapbook paper, I have leaves. I used a Cricut to cut some of the leaves and then just free handed others. I made large leaves and small leaves. I also made flowers. If you google prehistoric flowers, there are some really pretty ones.
I have made a couple of trees for the table. My local dollar tree had some 2 oz Mod Podge. I picked up a couple. This allows me to do small projects without having to open my big 16 oz bottle.

Inspiration hit this morning and I made the door decoration. I also sketched a dino on a poster board. I will paint it later or maybe tomorrow when all the kids are in school.
I can't wait to finish up the decorations. I just have to wait out Halloween. 

Here are some pictures of my progress. Keep an eye out for an update on the party.


 Thanks for stopping by! 

Sunday, September 7, 2014

Bows From Tights

I spent the morning going through my daughter's closet and her dresser. We tried on all the shorts, skirts and jeans she had. Then we went through her shirts, dresses, sweaters and jackets.

I do not really need to go school clothes shopping this year. She has received some new shirts over the summer and had some new ones in her closet. She also had some shorts that I picked up on sale a while back.

While going through everything, I came across some tights that no longer fit. While I could just as easily put them in the donation pile, they looked fit to be made bows!
These bows can easily be made without sewing, but I like the added strength that sewing adds to the bows. (I have been knows to make bows right before school. In those cases I have used a small elastic to gather the ribbon and then just hot glue.)

Here is how it went:

The tights I found.

I love the color of the spots.

Cut off the top of the tights.

Cut the side seam of the "panty" part.

Cut along the waistband and the center seam.

Overlap the toe of the leg with the cut end.

Pinch and stitch.

Take the part cut from the panty and fold it over itself.

Use the panty to cover the center of the bow.

Now, I just hot glued the hair clip onto the bow at this point. I didn't get a picture of this yet, but promise to update it.


Hope you enjoyed. Thanks for stopping by.
Yadi

Saturday, November 23, 2013

Door Decoration

For my son's birthday, I made a number 2 to go on the door.

Our local Dollar Tree has some foam board. Part of the party decor was a tree that would go across the room. (We have a beam that divides our rooms.) I painted the foam board with brown acrylic paint. To vary the color, I watered down the paint. Once the paint dried the paper began to peel. So I did what any person would do, I peeled off the paper and used it to decorate the beam. I was left with the foam part of the boards. This "left over" board is what I used to make the number for the door.

I free handed the number and then used an exacto knife to cut it out. It did not matter that I had multiple pencil marks since the whole thing would be covered by streamer.

I used my hot glue gun (low temp) to attach the streamer to the number. The reason for the low temp is that I scrunched the streamer to make it ruffle. While the glue is hot, I pushed it together with my finger. High temp would be too hot and maybe even melt the foam.


I started at the bottom. The first piece of streamer I just glued down. I made sure to wrap it around to the back to cover the foam. I then began to ruffle it. All the pieces wrap around to the back. I also found it easier to just pull it off the streamer roll and cut once I was done making the ruffle.

For the very top, I just glued down a piece of streamer and wrapped it around to the back. To hang it on the door, I used a Command Strip. The number is really light.

While I was doing the number, I got an idea about decorating for Christmas. I made a Christmas tree for my door!!! I used the same technique. I see more door decorations made this way in my future!

How about:
a red heart
a four leaf clover
an Easter egg
red, white, and blue star
a pumpkin or bat

Of course, I have two other kids with birthdays. I am thinking of either their birthday number or their initial.

I will post pictures of my Christmas tree when it is done.

Thanks for coming by,


Sunday, March 14, 2010

Quick Pillow/ Stuffy Tutorial

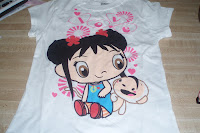
I was in Walmart the other day. I was looking at some t-shirts when my little one got hold of one that had Kai-lan on it. Of course, the t-shirt was a size 6 and my daughter is 19 months. She just hugged on it and would not let it go.

That of course gave me an idea when I got home. I made her a Kai-lan pillow out of the t-shirt. I was surprised by how cute it came out and how quickly I got done. Here's how.


Need:
t-shirt
sewing machine
stuffing


Here is the t-shirt I started with:


Turn the t-shirt inside out and pin it together.


I traced a line around the image about half an inch away. This was my sewing line. I pinned along the line so that the shirt did not move. Then just sew, but make sure to leave an opening so that you can turn the shirt inside out. (the picture below is of the shirt sewn.)


Next cut away the excess shirt. I left a little less than half an inch. Also be sure you clip into the excess, being careful not to cut a stich, so that the curves are smooth when you turn it inside out. I forgot to take pictures of this step or when I turned it inside out.

Once it is inside out, stuff and then stitch your opening closed. My little one loved it so much, she took her nap with it.


The whole process took me less than half an hour. If you have any questions, feel free to ask. I am very new to sewing so if I can do it, anyone can!!


Thanks for stopping by!!