I have mentioned how often I go to the thrift store on previous posts. There are two such stores just up the street from the dance studio my children attend. Instead of sitting in the studio or our in my car, I just go up the street and shop. There are a few specific things I look for when I go in.
1. Baby clothes: Newborn and preemie baby items can easily be converted into 18" doll size. (My daughter has an American Girl, a Journey Girl, a Madame Alexander and a Be My Girl doll.) Other baby items that are a quick redo are skirts. I look for items that look like something an older girl would wear. I stay away from the items that are really baby.
2. Jewelry boxes: If you search Pintrest for AG doll house you will begin to notice all the jewelry boxes that have been redone as furniture. They are great as side tables, dressers, bathroom vanities and anywhere you would have a piece of furniture with drawers. Since the end product will be something my daughter will play with, I can get away with a light sanding and painting.
3. 18" dolls: One of the thrift stores I go to has 18" dolls available on a regular basis. Most of the time they are the Our Generation dolls from Target. Sometimes they will have Madame Alexander dolls. I was lucky enough to find a genuine American Girl doll there as well. The price is usually between $4 and $9. I will buy these dolls even if we are not keeping them. There is a great organization called The Broken Doll that takes dolls and gives them a makeover. They are then given to children in need.
4. Books: I am an avid reader. I go through phases where I am reading a couple of books a week. I don't feel bad buying a book and then getting rid of it since I didn't spend that much.
5. Dance/ gymnastics wear: I have found some great leotards and skirts for my daughter for under $5. Score!
If I have time, I will go through the clothes racks and just browse. You do have to dig for the gems, but then again, when do you not.
Showing posts with label goodwill. Show all posts
Showing posts with label goodwill. Show all posts
Friday, May 22, 2015

Tuesday, May 12, 2015
Time To Sew
It is time to get my sewing machine out!
I have been going to my local thrift stores once a week since dance class started for my kids. We are almost at recital so I have a good stash of items I have purchased.
Preemie clothes and newborn are really close to American Girl size. These sizes can be harder to find in items that look like they could be little girl items since AG dolls are not babies. I stay away from onesies. Nothing will make that folded over collar look grown up. I look for skirts or dresses that I can make doll size quickly.
I have a bunch of patterns thanks to Pixie Faire. If you are interested in making doll clothes, sign up for the Pixie Faire newsletter. They send you an awesome and free pattern every Friday!! They also have some free patterns on their site.
I can't wait to finish up with my stash. I will upload pics when I can.
Here is my Pintrest board that has some great free patterns and ideas for accessories.
I have been going to my local thrift stores once a week since dance class started for my kids. We are almost at recital so I have a good stash of items I have purchased.
Preemie clothes and newborn are really close to American Girl size. These sizes can be harder to find in items that look like they could be little girl items since AG dolls are not babies. I stay away from onesies. Nothing will make that folded over collar look grown up. I look for skirts or dresses that I can make doll size quickly.
 |
| Some items from my stash. |
I have a bunch of patterns thanks to Pixie Faire. If you are interested in making doll clothes, sign up for the Pixie Faire newsletter. They send you an awesome and free pattern every Friday!! They also have some free patterns on their site.
I can't wait to finish up with my stash. I will upload pics when I can.
Here is my Pintrest board that has some great free patterns and ideas for accessories.
Monday, November 17, 2014
Christmas gifts
I am working on a couple of items for my daughter's Christmas. I have painted the "fridge" for my daughter's doll. My next step is to make food to fill it. I found a really good site with food printables. Paper Minis has pritables for doll house size and 18" doll size. The scale for AG dolls is 1:3.
I have a Muffy pie cabinet I found at goodwill which will make a good pantry.
I am trying to be as frugal as I can and looking everywhere for ideas. So, look what I found today at Tom Thumb:

I found the same brand of appetizer forks alone. I had them in my cart and then I came across the whole set. I recently purchased square plates for our household. I just LOVE these little ones. I can't wait to give these to my daughter for her dolls. Oh, and it was about $5.00 so my wallet is happy too.
I have been so busy, but I do have more I want to share. The dino party was a huge sucess, keep an eye out for that update.
Thanks for coming by.
Yadi
Thursday, October 30, 2014
3rd Birthday Party Time
I have stated before how much I love birthday parties. Well, in a couple of weeks my little guy turns 3. I went back and forth between a Mickey party or a dinosaur party. I asked him again last week and he said dinosaur. So the theme is set!! (Yes, I did have to send out invites on short notice. His birthday snuck up on me.)
Of course my first stop is ALWAYS Pintrest. I loved the parties where they used their plants from all over the house to decorate one room. Too bad for me I have a black thumb. Plants just DIE around me. What this leaves me with is making my own plants.
I picked up packaging paper at the dollar store and made vines to hang. (You just scrunch and twist.) Thanks for my stash of scrapbook paper, I have leaves. I used a Cricut to cut some of the leaves and then just free handed others. I made large leaves and small leaves. I also made flowers. If you google prehistoric flowers, there are some really pretty ones.
I have made a couple of trees for the table. My local dollar tree had some 2 oz Mod Podge. I picked up a couple. This allows me to do small projects without having to open my big 16 oz bottle.
Inspiration hit this morning and I made the door decoration. I also sketched a dino on a poster board. I will paint it later or maybe tomorrow when all the kids are in school.
I can't wait to finish up the decorations. I just have to wait out Halloween.
Here are some pictures of my progress. Keep an eye out for an update on the party.


Thanks for stopping by!
Thursday, October 23, 2014
Hand Made Christmas
I have never been very confident in my ability to do anything well enough to have a hand made Christmas. I am a beginner at sewing, amateur jewelry maker and amateur crafter.
Since my daughter is American Girl obsessed, as I have said in previous posts, I am going to make some of her gifts. I found a little cabinet at goodwill which I think will make a perfect little fridge. I will be crafting items to go inside of it. I am also thinking of adding images to the insides of the doors that reflect the inside of a fridge. I am not sure where I will find the images, but I will have to look around.
I also found a little pantry at goodwill; it already contained two pies. I am going to paint this as well since I think it would look weird to leave it white when I am painting the little "fridge" black.
My local Tuesday Morning happened to have some 18 inch dolls. They also had a cute table and chairs set for $20. I was so excited. I know she is going to love these. I am making some little seat cushions and a table cloth.
My 8 year old son is into video games and I really can't think of ANYTHING to get him or make him. I really limit how much he can play video games during the week.
I guess I will be looking around on Pintrest for any ideas for my boys. If you see anything...let me know!!
Since my daughter is American Girl obsessed, as I have said in previous posts, I am going to make some of her gifts. I found a little cabinet at goodwill which I think will make a perfect little fridge. I will be crafting items to go inside of it. I am also thinking of adding images to the insides of the doors that reflect the inside of a fridge. I am not sure where I will find the images, but I will have to look around.
I also found a little pantry at goodwill; it already contained two pies. I am going to paint this as well since I think it would look weird to leave it white when I am painting the little "fridge" black.
My local Tuesday Morning happened to have some 18 inch dolls. They also had a cute table and chairs set for $20. I was so excited. I know she is going to love these. I am making some little seat cushions and a table cloth.
My 8 year old son is into video games and I really can't think of ANYTHING to get him or make him. I really limit how much he can play video games during the week.
I guess I will be looking around on Pintrest for any ideas for my boys. If you see anything...let me know!!
 |
| The "fridge" I found. Needs some paint. |

 |
| Needs some paint on the inside too and maybe some "fridge" images. |

Monday, October 6, 2014
Butterfly Hole Punch Has Broken
I have loved my butterfly hole punch. I have a box full of beautiful butterflies I have punched from magazines. Now that I won't be using my hole punch again, I guess it's time to do something with all my butterflies.
I was at a thrift store last week and found a couple of cooling racks. I am going to make some butterfly mobiles. These have always been my plans for the butterflies, but I always put other projects first.
In honor of my broken hole punch, I am going to make one.
I didn't realize how much loosing my hole punch would bum me out. I receive various magazines and I always automatically look at the color combinations I could use my butterfly punch on. Now I flip through my magazines and think "what if."
So if you have an extra butterfly hole punch...or if it is sitting in a drawer somewhere gathering dust...I would LOVE to have it.
I was at a thrift store last week and found a couple of cooling racks. I am going to make some butterfly mobiles. These have always been my plans for the butterflies, but I always put other projects first.
In honor of my broken hole punch, I am going to make one.
I didn't realize how much loosing my hole punch would bum me out. I receive various magazines and I always automatically look at the color combinations I could use my butterfly punch on. Now I flip through my magazines and think "what if."
So if you have an extra butterfly hole punch...or if it is sitting in a drawer somewhere gathering dust...I would LOVE to have it.
Tuesday, June 3, 2014
From Toddler Dress to Two Doll Dresses
With my daughter's birthday just around the corner, I have been busy making things for her Journey Girl. I took a little trip to our local Ikea yesterday to pick up a couple of doll beds. I have been looking online at what is available for 18" dolls. Ikea has beds for $20. Make me smile. (Here is their bed listing.)
Then of course, I had to make new pillows for her bed since the ones it came with where flat...literally. I see making a foam mattress in my near future as well.
I have also been going by Goodwill and looking for little girl clothes I can alter to fit her Journey Girl. I came across a really cute 2T dress that was perfect! Here is how I made two doll dresses out of this one toddler dress. (Just FYI: Journey Girls are a little thinner than American Girls. While a 2T worked great for our JG, it may be too tight on an AG doll. I would suggest maybe 3T or 4T dress if you are looking to redo it for an AG doll. )
Here is the dress. It is not a tube, but rather has seams along each side.
 I just lined up the seams and pinned down the center. I tried it on the doll to make sure it would fit.


I did not use a "seam allowance." I just put my presser foot right up against the edge of the lined up seams. (I should state hear that I am an amateur at sewing so this is really something a beginner can do.)

Where the dress was shirred, I did a back stitch over each line. Sorry for the blurry picture, I hope you can still see what I mean. I did not know if the shirring would come undone with a single stitch, so I didn't take any chances.

I cut right next to the seam and the dress was almost done!

I put it back on the doll to check the strap placement. I just cut the straps off the dress and pinned them where I wanted them. Then you just stitch them in place and the dress is done.


For the second dress I just folded up the length. I used my flat iron to press the bottom seam. (Way faster than my iron.) I then just sewed it up.
 (I will take a finished picture on the doll and upload later.)
Hope you give this a try. Let me know how it came out!!!
Thanks for stopping by.
Then of course, I had to make new pillows for her bed since the ones it came with where flat...literally. I see making a foam mattress in my near future as well.
I have also been going by Goodwill and looking for little girl clothes I can alter to fit her Journey Girl. I came across a really cute 2T dress that was perfect! Here is how I made two doll dresses out of this one toddler dress. (Just FYI: Journey Girls are a little thinner than American Girls. While a 2T worked great for our JG, it may be too tight on an AG doll. I would suggest maybe 3T or 4T dress if you are looking to redo it for an AG doll. )
Here is the dress. It is not a tube, but rather has seams along each side.
I did not use a "seam allowance." I just put my presser foot right up against the edge of the lined up seams. (I should state hear that I am an amateur at sewing so this is really something a beginner can do.)
Where the dress was shirred, I did a back stitch over each line. Sorry for the blurry picture, I hope you can still see what I mean. I did not know if the shirring would come undone with a single stitch, so I didn't take any chances.
I cut right next to the seam and the dress was almost done!
I put it back on the doll to check the strap placement. I just cut the straps off the dress and pinned them where I wanted them. Then you just stitch them in place and the dress is done.
For the second dress I just folded up the length. I used my flat iron to press the bottom seam. (Way faster than my iron.) I then just sewed it up.
Hope you give this a try. Let me know how it came out!!!
Thanks for stopping by.
Friday, September 10, 2010
Fun with a book!
My dad is an avid reader. He goes through times that he reads almost a book a day. That said, you can't just buy him a book for his birthday or a holiday. The other day I was in the Goodwill store and they where having a great sale on their books. 5 for $1.00. I picked up a book for my dad...sure enough, he had read it.
So, what to do with a book he had already read that was a great deal?
Have any of you ever watched the movie "The Shawshank Redemption"? Remember what was hidden in the bible? Yeah, I got that idea.
I decided to keep some pages free at the beginning of the book and use the rest to make a secret compartment. First I put a piece of wax paper after my last page of "free" section and after real last page (in front of the back cover). I then used my mod podge to glue the pages between the wax paper together. After you apply one coat, let it dry with other books or something heavy sitting on top of it. This will insure the pages are pushed together while they dry. Add a second or third coat. Then you can begin to carve out the inside. Let me just say that this is not any fun. I have kept all the page pieces to use on other project as well.
 Once I finish carving out the inside, I will mod podge the inside. I will use sand paper to make sure the sides are smooth. I might even paint the inside with acrylic paint just for a "pop."
I will show you some of the other crafts that have come out of this project!
I have two days a week that both kids are in a program at church. Yay for me time!!
Thanks for coming by,

So, what to do with a book he had already read that was a great deal?
Have any of you ever watched the movie "The Shawshank Redemption"? Remember what was hidden in the bible? Yeah, I got that idea.
I decided to keep some pages free at the beginning of the book and use the rest to make a secret compartment. First I put a piece of wax paper after my last page of "free" section and after real last page (in front of the back cover). I then used my mod podge to glue the pages between the wax paper together. After you apply one coat, let it dry with other books or something heavy sitting on top of it. This will insure the pages are pushed together while they dry. Add a second or third coat. Then you can begin to carve out the inside. Let me just say that this is not any fun. I have kept all the page pieces to use on other project as well.

I will show you some of the other crafts that have come out of this project!
I have two days a week that both kids are in a program at church. Yay for me time!!
Thanks for coming by,
Sunday, May 16, 2010
New Stuff I Have Done
When I came across this tutorial for Clothespin Dolls, I was in love. (Thank you Going Sew Crazy for the tutorial!) I think these will be really cute as a take home for my daughter's birthday party coming up in mid June. I plan to put a little candy in their "hands" or maybe a "thank you for coming" note.

I picked up a jewelry box from goodwill for $3.00 the other day. There was not really anything wrong with it, but I wanted to give it an "adult" update. I need to add the ribbon around the front and bottom to be done. I am really happy about how it has turned out.
BEFORE:

AFTER:

Like always, I have more stuff I am working on.
Thanks for coming by!

I picked up a jewelry box from goodwill for $3.00 the other day. There was not really anything wrong with it, but I wanted to give it an "adult" update. I need to add the ribbon around the front and bottom to be done. I am really happy about how it has turned out.
BEFORE:

AFTER:

Like always, I have more stuff I am working on.
Thanks for coming by!
Sunday, June 28, 2009
Arts and Crafts
I have always been the kind of person that is doing crafts. At one point I was really into making jewelry. Having my son put a stop to that.
I have since taken up, well, I'm not sure what to call it. I like paper crafts and have discovered the joy of mod podge.
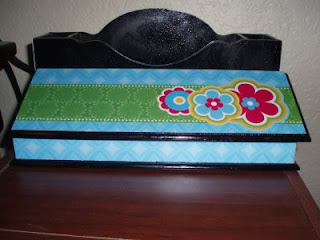
At the Goodwill store I came across a desk caddy I really liked, but it was ugly. So I ran to Walmart to purchase some spray paint, hoping to redo it. When I started, I failed to notice that the regulator was missing from the nozel. So my paint job has bubbles. I could redo it, but who has that kind of time. Maybe later.
Lesson Learned: check your spray paint before you use it.
After and Before: sorry for the order

I have since taken up, well, I'm not sure what to call it. I like paper crafts and have discovered the joy of mod podge.
At the Goodwill store I came across a desk caddy I really liked, but it was ugly. So I ran to Walmart to purchase some spray paint, hoping to redo it. When I started, I failed to notice that the regulator was missing from the nozel. So my paint job has bubbles. I could redo it, but who has that kind of time. Maybe later.
Lesson Learned: check your spray paint before you use it.
After and Before: sorry for the order


Subscribe to:
Posts (Atom)