I am sure I am not the only one out there that has a small problem with craft supplies. I have to avoid going to places like Hobby Lobby and Joann's. If I go into those kinds of stores with a few items to buy, I come out with at least a bag full if not more. What is it about the red clearance tags that makes them so hard to resist?
I have decided that I need to make a plan to USE the supplies I have accumulated. I tend to be very scattered when it comes to what I do. I have multiple projects going at once so of course nothing gets finished.
Well, NO MORE!!! (I just heard this in Scott Pilgrim's' voice.)
I am going to go on a project binge. I got started last night organizing my supplies. I hope to have this stage finished by the end of the day. Then tomorrow the projects start!!!
I will have to add some pics of the things I get done so keep an eye out!
Oh, and if you are wondering how the "face painting" at field day went...let me just say I had a blast!!! I painted a ton of spiders on little boys arms, I did some hearts and I got to use a split cake to do rainbows.
I ordered the rainbow split cake on the pretext that I had volunteered to do face painting at the field day. I am so glad I did. There where a large number of kids that wanted rainbows and it was SUPER fast to paint the rainbow and then add some clouds. I LOVED it.
http://www.amazon.com/gp/product/B00FE92APK/ref=oh_details_o04_s00_i00?ie=UTF8&psc=1
Stay tuned to see how my new plan works! Thanks for reading :)
Showing posts with label crafts. Show all posts
Showing posts with label crafts. Show all posts
Monday, April 14, 2014

Thursday, July 22, 2010
Butterfly Hole Punch 2
My daughter and I go to the dollar store at least once a week. On our weekly trip I ran across some long frames that I thought would be perfect for a project I had in mind. A while ago I saw this (butterflies in a frame) project featured on the blog One Pretty Thing. (Which I check on almost a daily basis.)
One more thing: Whenever I go to Home Depot, I always have to go by the paint section. I am not really sure why, but it is my favorite. On one of my trips I brought home a booklet with paint ideas for different rooms. I loved the ideas...then I got one more.
I began to punch out butterfies using the paint idea book. There where some beautiful textures and color combinations. The resulting butterflies are stunning. I LOVE them.
The mat in the frame needed to have the dividers removed. I then cut wrapping paper to fit the frame.

 Finally, I used small glue dots to place the butterflies. Of course, I am a bit of a freak about them being equidistant. I printed off a table from my word processing software and used it as a guide to punch the holes I needed.


I will take a picture when I put it up and add it here. I also need to finish the second frame. So, keep an eye out for new pictures.
Thanks!!

One more thing: Whenever I go to Home Depot, I always have to go by the paint section. I am not really sure why, but it is my favorite. On one of my trips I brought home a booklet with paint ideas for different rooms. I loved the ideas...then I got one more.
I began to punch out butterfies using the paint idea book. There where some beautiful textures and color combinations. The resulting butterflies are stunning. I LOVE them.
The mat in the frame needed to have the dividers removed. I then cut wrapping paper to fit the frame.


Thanks!!
Tuesday, July 20, 2010
Butterfly Hole Punch!
 I found a Martha Stewart butterfly punch while I was at either Ross or Marshall's. The price was about $4.00. I picked it up not really knowing what would come of it, but seeing lots of fun in my future.
 I had attempted to make a light canvas, but it did not come out like I wanted...so there will be no pictures here. Of course, I had make holes in the canvas to push the lights through. This left a "ruined" canvas. I did not have the heart to throw it away and thought maybe I could just cover the whole canvas in paper once inspiration hit.
Well, call the butterfly hole punch inspiration!! I found it really hard to take a picture of it on the wall. The only time that room gets full light it early morning, and I always forget to take a picture then.

I have some really pretty scrapbook paper. Some of the flowers have glitter on them. I punched out butterflies from a solid color sheet as well. I then just used some hot glue to put butterflies over the holes left from the lights.
Here are some close-ups.


Thanks for coming by,
Sunday, May 16, 2010
New Stuff I Have Done
When I came across this tutorial for Clothespin Dolls, I was in love. (Thank you Going Sew Crazy for the tutorial!) I think these will be really cute as a take home for my daughter's birthday party coming up in mid June. I plan to put a little candy in their "hands" or maybe a "thank you for coming" note.

I picked up a jewelry box from goodwill for $3.00 the other day. There was not really anything wrong with it, but I wanted to give it an "adult" update. I need to add the ribbon around the front and bottom to be done. I am really happy about how it has turned out.
BEFORE:

AFTER:

Like always, I have more stuff I am working on.
Thanks for coming by!

I picked up a jewelry box from goodwill for $3.00 the other day. There was not really anything wrong with it, but I wanted to give it an "adult" update. I need to add the ribbon around the front and bottom to be done. I am really happy about how it has turned out.
BEFORE:

AFTER:

Like always, I have more stuff I am working on.
Thanks for coming by!
Tuesday, February 9, 2010
Valentine Cards
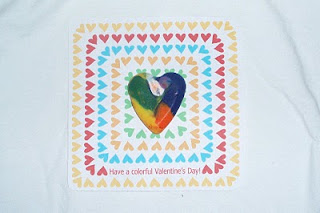
I know I am not the only one that is watching their wallets this year. For my son's school, he needs 22 cards for Valentines Day. The other day I found this wonderful option. Thank you to the Long Thread for sharing.
If you have little kids, you probably have more crayons that you need. What a wonderful way to put them to work.
I did not have a heart mold when I began. I was walking through Target and spotted some ice trays for $2.50. They where made out of silicone, but did not have a label which stated they where dishwasher safe. I was wondering since I planned to put them in the oven. So I looked online for the general degree resistance of silicone. Sure enough, it would take a ton of heat to melt them.
I put them in the oven at 250 degrees and they came out fine. Also, I did this more than once. The first time I made the crayon hearts, I used rose art crayons. Those came out with a wax that had floated to the top. This wax does not draw. I then used a crayola crayon. Once again, they prove why they are my favorite brand.
Let me show you some pictures:
$2.50 ice trays: probably could put some pam in the trays to make the crayon not stick so much

Finished cards. Stuck the heart on with sticky squares from the dollar store. (already on hand)
Ohh, let me share one more thing. My new favorite shoes what I got for $7 on clearance at Marshall's.

If you have little kids, you probably have more crayons that you need. What a wonderful way to put them to work.
I did not have a heart mold when I began. I was walking through Target and spotted some ice trays for $2.50. They where made out of silicone, but did not have a label which stated they where dishwasher safe. I was wondering since I planned to put them in the oven. So I looked online for the general degree resistance of silicone. Sure enough, it would take a ton of heat to melt them.
I put them in the oven at 250 degrees and they came out fine. Also, I did this more than once. The first time I made the crayon hearts, I used rose art crayons. Those came out with a wax that had floated to the top. This wax does not draw. I then used a crayola crayon. Once again, they prove why they are my favorite brand.
Let me show you some pictures:
$2.50 ice trays: probably could put some pam in the trays to make the crayon not stick so much

Finished cards. Stuck the heart on with sticky squares from the dollar store. (already on hand)

Ohh, let me share one more thing. My new favorite shoes what I got for $7 on clearance at Marshall's.

Thanks for coming by!!
Tuesday, January 5, 2010
Toy House
My little bunny is still in diapers. We buy the large pack of diapers and wipes since we will use them, and it saves some money. The empty boxes are extremely useful for packing up toys or other items to be put out in the garage until we have a garage sale or a donation drive comes by.
Today my 1 1/2 year old and I where playing tickle with a stuffed dog. We had an empty box of huggies wipes sitting on the floor and it dawned on me. "This would be a really cute dog house."
Of course, I did not take a single picture as I was making it. When I showed it to my husband he actually liked it. My son, 3 1/2 years old, really liked it. He wanted to put ALL his stuffed animals in it. This lead me to make a house out of the box of diapers. I did take some pictures of making this, but I got lazy and began using tape instead of rubber cement.
I will upload some pics tomorrow so that I can explain the process.


Today my 1 1/2 year old and I where playing tickle with a stuffed dog. We had an empty box of huggies wipes sitting on the floor and it dawned on me. "This would be a really cute dog house."
Of course, I did not take a single picture as I was making it. When I showed it to my husband he actually liked it. My son, 3 1/2 years old, really liked it. He wanted to put ALL his stuffed animals in it. This lead me to make a house out of the box of diapers. I did take some pictures of making this, but I got lazy and began using tape instead of rubber cement.


This is the small dog house made out of the wipes box. As you can see, I cut out some windows on the side. I used plain printer paper, so the details of the box bleed through. If you use a heavy stock, this would not be a problem.
TUTORIAL:
supplies-
empty box
printer paper or heavy stock
glue (rubber cement works great and dries fast) or tape
scissors or exacto knife
I did not want to be picture intensive, since the process is simple.
I cut off the small lid flaps first. Then I enlarged the opening on the side all the way to the bottom to make a door.

I folded the small lid flaps and attached them to the large flaps left to make the shape of the roof. As you can see, the top part of the sides are left open. From this point I just began adding paper onto the box. Rubber cement works great. I used tape on this box because I was being lazy.

You can leave the top portion of the sides open if you would like so that the kids can see in and play with the inside. (My son insisted I cover them.) There is also a space left on the roof that can be uncovered to allow you to see in.
To cover the front I simply folded the corners of a piece of paper under the sheet for the roof and tucked the rest back into the "house."

My son put about 9 stuffed animals and toys into the large box.
Enjoy,
Sunday, November 8, 2009
BOWS BOWS BOWS
Today has been a really good day. Watched some really great football. Spent some great time with the family. And got to sit and make some bows.
I am so glad I have a little girl to dress up. I think there is nothing sweeter than seeing her cute grin with a bow in her hair. I still have a bunch of bows to finish, but was able to make quite a few.
Of course, I have not loaded the pictures yet....but hey, that's something to look forward to. (UPDATE 11/9/09: Pictures uploaded - some of what I got done.)


I am so glad I have a little girl to dress up. I think there is nothing sweeter than seeing her cute grin with a bow in her hair. I still have a bunch of bows to finish, but was able to make quite a few.
Of course, I have not loaded the pictures yet....but hey, that's something to look forward to. (UPDATE 11/9/09: Pictures uploaded - some of what I got done.)


Tuesday, October 27, 2009
DONE - Flower Mobile
I finished the flower mobile!!!!!!

It took longer than a couple of naps and I ended up needing to cut more flowers then I thought, but it is finished.

The cost was minimal:
$4.00 for the plant stand at Big Lots. (which is the top)
$2.00 for sticky squares at the dollar store (in stead of using glue)
$0.00 for the white paper
$0.00 for the dental floss (I used the samples my dentist gave me)
I am so happy with the result.
I purchased felt at the dollar store, who knows, I may make another one.

Subscribe to:
Posts (Atom)